How to make the most of your trip to Copenhagen 

1. Hire a bike!

Definitely my favourite way to see the city and pretty cheap to hire (you can get a discount with the Copenhagen Card – see below). Most of the population cycle and cyclists are well respected on the road so there’s no reason to feel nervous. Often there are designated bike lanes so you don’t need to worry at all. Just look around you and enjoy the sights.

2. Get a Copenhagen Card

I bought the 72hr Copenhagen card and it was so worth it! Not only does it cover all your transport in that time period – metro, subway, underground, overground, boats and buses. It also gets you a 20% discount on bike hire AND free entry to over 70 of Copenhagen’s attractions. That covers EVERYTHING you could possibly want to do there. Just a few examples of what it covers are: Tivoli, Amalienborg Palace, Frederiksborg Castle, Rosenborg Palace, the Round Tower and so much more; just check out the website.

3. Stay in an Airbnb

This was a lifesaver and a money saver. Not only do you live like a local, it’s also ridiculously cheap which counterbalances how expensive the rest of Copenhagen is. Three of us stayed in a lovely apartment right on the M1 metro line in Frederiksberg for 3 nights and it cost us £63 each. That was just over £20 a night!

4. Take the train to Sweden 

Who could say no to taking a day trip to another country? Malmö is only half an hour by train, about  £20 and you cross the famous Øresund Bridge to get there. Malmö is small but cute – check out Lille Torg – the little square in the old town. It’s a lovely change and fun to do if you have time while you’re in Copenhagen. 

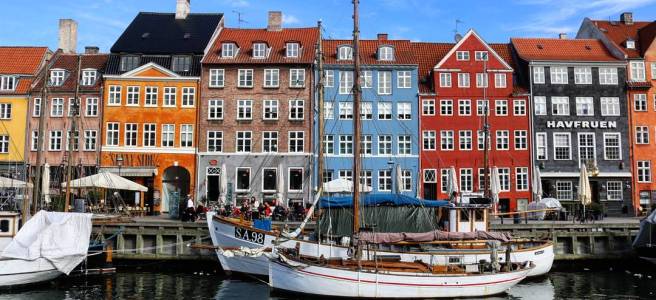
5. Take a walk along Nyhavn 

Everyone going to Copenhagen has to see Nyhavn. It’s unmissable with its brightly coloured buildings, restaurants, bars and waterways. Take a walk down both aides to get the atmosphere and experience or even take a boat ride. It’s very expensive though so be warned! It might be wise to just stop for a beer.

6. Spend a day along the waterfront – both sides!

The waterfront from Nyhavn going north will lead you past Amalienborg Palace where you can see the changing of the guards at midday. It will also lead you up to the Little Mermaid statue as well as some lovely scenery on the way. On the opposite side, if you cross the bridge at the bottom of Nyhavn, you can get to Christianshavn Freetown built in the 80s and still retaining that vibe and identity. There are lakes to cycle along there and don’t miss the indoor street food market!

7. See some live music 

We did this spontaneously and had the best night. We went to a small bar called the Hvide Lamb (the white lamb). It has local jazz bands playing ever night of the week in a small, smokey, local bar. With genuine talent and Danish beers, what’s not to love?
Do you have any top tips to add?

My top 10 tips for Tokyo

Maybe you’ve only got a few days to spend there, or maybe there’s so much to do you don’t know where to start (yep I feel ya) but here are my top 10 tips for your trip to Tokyo.

1. Buy a Suica Card
This was my lifesaver. I bought it at the airport, topped it up with 2000 yen and I was good to go. It basically works like an Oyster card or any other transport card where you tap in and tap out. Super quick and easy – just top up whenever you need to at the ‘fare adjustment’ machines found in every station. The great thing is that it can also be used on inner city transport in other cities, so I was able to use it in Tokyo, Osaka, Kyoto and Wakayama. Check the city transport website for you’re going to see if it applies.

2. Get most of your currency before your trip
Okay so some of you might do this anyway. I’m usually a fan of just getting it out the ATM at the airport when I arrive or using my bank card everywhere; I don’t like carrying lots of cash on me. However, some Japanese card machines don’t like western debit cards, some only accept cards issued in Japan, some places only accept credit cards rather than debit cards and some ATMs only function 9am – 5pm. So save yourself the hassle and take your cash.

3. Plan in advance
Again it might be obvious for some of you. When I travel I usually have a list of things I want to see and figure out my plan roughly or play it by ear when I get there. This does not work so well in Tokyo. Tokyo is made up of what was originally 11 cities now all merged, so it is huge. It will serve you well to have a fairly structured itinerary when you arrive so you cover each area of the city logically. It’s not like small European cities where you can just hop on a metro and be across the other side of the city in 10 minutes.

4. Stay in Shinjuku
Okay I might be biased. But if you’re young and/or want to sample the nightlife, this is where it’s happening. Karabukio, Harajuku, Golden Gai are all based here. Shinjuku comes alive at night with lights, music, food, drink and karaoke; you don’t want to be across the city and missing it. Plus Shinjuku station is directly accessed from the airport and is the busiest train station in the world – so wherever you’re going next, you’re in the right place.

5. Pick your sights
There’s so much to see and you might not have long, so prioritise what gardens, shrines and observation decks you want to visit otherwise you’ll be doing a lot of the same.

6. Eat the local food
This wasn’t hard for me, I’m a huge ramen fan and proper sushi is my guilty pleasure so having it in ready supply was a dream. Street vedors can be super cheap for a quick ramen in the day and sushi is fresh and often cut and prepared right in front of you as you order. Don’t be intimidated by the Japanese names and huge range of foods on some menus. Which leads me to…

7. Don’t be afraid to ask
There is a common misconception that Japan is perhaps not as friendly as other south east asian countries, but that is not true at all. Japanese culture is based in respect so the people are some of the nicest I’ve ever met whilst travelling. The locals may not all have great English but it is appreciated if you make an effort and if you ask something they will try their best to help you always.

8. Know your way home
This is more for you solo travellers who might be out late alone but it goes for anyone. If you find yourself in a part of the city you don’t know, make sure you know which subway line or bus route is available at 2am to get you back to where you need to be. A lot of the public transport is not 24hrs so it closes over night – don’t end up in a sticky situation!

9. Pack for all weathers
Seriously. I had 25 degree heat the day I arrived and a torrential thunderstorm the following evening. It varies like this in the inbetween season but I found myself in shorts and a tshirt in the pouring rain because the weather changed so fast.

10. DON’T PANIC
Tokyo is bright, loud and can be overwhelming. When I arrived in from the airport to Shinjuku station jetlagged and exhausted with 15kilos on my back, I nearly cried when I learned there were 52 platforms, a shopping centre, a bus station and over 30 exits in the biggest train station in the world. Even for a seasoned traveller like me I was overwhelmed with the thought of having to find my way to the right exit or transfer lines. Don’t panic, ask if you need to. And the same for the rest of the city, just enjoy it and learn from any mistakes or wrong turns – getting lost in Tokyo can be fun!

Have you been to Tokyo?

5 things to do at Mount Fuji (if you don’t actually want to climb it)

1. Find the best views of Fuji

Just because you don’t want to climb it, doesn’t mean you can’t find a stunning spot to admire it from. Chureito Pagoda is the iconic one and only a short train ride from Lake Kawaguchiko, on a clear day it’s so worth it. It’s clearer in the mornings usually so if you can get there for sunrise, even better! The north shore of Lake Kawaguchiko and also Lake Saiko also have stunning views.

2. Hire a bike

I cycled around Lake Kawaguchiko in about 3 hours taking stops on the way to admire the view of Fuji and the cherry blossom plus there are market stalls and the small town to see on the north shore. The roads are quiet and the scenery is made to be enjoyed on a bike so give it a try and you won’t regret it.

3. Hot springs 

Japanese onsens are famous and you can find some brilliant onsens around Fuji Five Lakes. There are both public and private onsens and your hotel (or even your room) may have its own. Be warned though, you’re not allowed to wear swimwear in them as it pollutes the natural minerals.

4. Sake brewery and tasting experience 

On the south shore of Lake Kawaguchiko there is a sake brewery which still brews and sells it’s own sake. You see the whole process, get to taste 5 different types of sake and there is the opportunity to buy your favourite at the end for a very good price. These tours sell quickly so ask or hostel/hotel to book this for you asap.

5. Kimono museum 

The kimono museum is on the north shore of Lake Kawaguchiko and really well signposted. It showcases the lifetime work of Itchiku Kubota with a series of kimonos designed to depict the seasons around Mount Fuji on the designs. The setting of the museum itself is stunning with gardens and waterfalls to walk around and a Gaudi-style foyer. It’s a relatively small museum to see so it doesn’t take long but it’s worth it for the gorgeous kimonos.

Best hikes in Hong Kong

Victoria Peak

The classic and well known of the peaks in Hong Kong. The Peak, as it’s known by locals, offers unparalleled views of the city on a clear day. You can take the funicular peak tram to the top then enjoy the hike trail around the peak which is a circular route through greenery and park land which is popular with local joggers. Beware though, the peak tram queues can be huge so get there before 8am. Alternatively there is a winding path up the peak to the view point. It’s a tough uphill probably best saved for the cooler evening to catch sunset but we’ll worth it for the view, the exercise and the incredible apartments on the hill with views of the Bay.


Lantau Trail

If you’re headed out to Lantau Island to see Big Buddha and the Monastery then make a day of it and hike the Lantau Trail. Wear good shoes and take lots of water, it’s not the toughest hike ever but it’s uneven and hot and humid in jungle like conditions. There are great breaks for picnic spots and incredible views of green valleys on the island and the dam lake, not to mention the imposing Big Buddha statue you’ll always be able to see on the skyline.


Lion Head

Another popular one for visitors to Hong Kong. As part of Lion’s Head Country Park there is tonnes of beautiful scenery and trails to hike. Lion Head is a fairly easy hike with great views of Kowloon, the bay and Tsuen Wan. There’s also the popular Mong Fu Shek and Beacon Hill so you can easily make a day from hikes here!

Dragons Back

This is a  option if you want  escape the city for the day. Based in Shek O Country Park this is an 8.5km route along a ridge with gorgeous panoramic views of the city which offer a different perspective from the typical Peak hike. It’s not a super hard hike but make sure you’re prepared and have plenty of water and snacks.


Kowloon Peak – Suicide Cliff 

This is definitely the hardest trek, at 600m Kowloon Peak is the highest in the area plus the steep steps that are part of the climb. The South Ridge is home to the famous or infamous Suicide Cliff, known for its incredible terrain and photography opportunities, especially after the iconic photo feature on National Geographic. It’s recommended you only complete this hike if you are experienced and always complete it in a group. But the iconic cliff and views are totally worth it.

Have you done any of these hikes?

72 hours in Tokyo

So last week I only had 3 full days to see Tokyo, if you’re wondering how (believe me, I was too) then here is my itinerary below:

Day 1

Shinjuku Gyoen National park. With blossom, Japanese traditional garden, all sorts of gardens and contrasted with view of the city. 

Meiji shrine – main shrine is construction but see front building get fortune, cleanse hands and mouth, surrounding gardens, sake barrels.

Metropolitan government building – 40 min wait was warned but it wasn’t that long. Got up there in time for sunset. City in every direction, see the lights come on as dusk comes down. Free and so worth the view.

Karabukio and Golden Gai – walking round district to see the lights and grab some food. Karabukio is home to the famous Robot Restaurant if you fancy a typically bizarre Japanese experience. Golden Gai is labrinyth of streets with tiny bars that only seat 5/6 people so get there early! Often a cover charge, and full of locals so try to blend in and don’t take loads of photos.

Day 2

Sensoji shrine first thing in the morning, it’s worth getting there early to avoid the crowds as the shrine and nearby Asakusa temple get extremely busy. I actually preferred this temple to the Meiji shrine, there was more to see, it’s surrounded by a traditional market and the red colour is gorgeous. 

Koishikawa Korakuen Gardens were next – take advantage of your metro day pass or Suica card to get you around the city. These were my favourite gardens with lots of beautiful sections and scenic paths. It was like an oasis in the middle of the city with its full moon bridge, stepping stones and cherry blossom.

Imperial Palace isn’t open usually except from public holidays but the gardens and grounds are still lovely to walk around the palace and to give you an idea of traditional Japanese architecture for palaces and their surroundings.

In the evening I went to see Shibuya Crossing – the busiest pedestrian crossing in the world. It’s definitely worth going to see and experience it – I crossed it several times just for fun! You can view it from above either from the Starbucks or from the surrounding hotels and restaurants if you have a reservation. 

This evening I met a group of fellow travellers out in Shinjuku and we ended up going to a karaoke booth and singing the night away until the early hours. Proper Japanese karaoke is away must!

Day 3

Again I got up fairly early to head to Tsujiki fish market. Some people may want to go at 4am to see the biggest tuna fish auction in the world. Sadly I’m not that hardcore for my sushi. However going early means you can experience the bust morning rush of the biggest wholesale fish market in the world and bag yourself some fresh, tasty sushi for breakfast.

Tokyo National Museum was my next stop and I was amazed at how cheap it was – 500 yen so that’s about £3.50 for me. So totally worth it even if you only want to pop in for an hour to see an exhibition or two. My favourites were the National Treasures exhibit, the Japanese art and rise of Buddhism and Buddhist art exhibits. The sword and military exhibits are also worth a look but there is loads of history of Japan in terms of culture, politics, religion and art, so something for everyone.

On my way to Tokyo Tower I came across Zohu shrine on the road just below the tower. It’s quiet but lovely and I happened to catch a monk striking the gong which was the experience of it.

Tokyo Tower is definitely worth a visit on a clear day. I had an exceptionally clear day and the great thing is that there isn’t an time limit on the ticket so you can stay up there as long as you like. I went up about 5pm and stayed until after sunset. The day was so clear I could see Mount Fuji in the distance and the sun setting there was spectacular. Watching the lights come on across the city was definitely an awesome experience and a completely different view from the Metropolitan Government building.

And those were my three days in Tokyo! There is obviously so much more to see, not to mention the tonnes of parks and shrines there are to see. One thing I didn’t do was the Tokyo Skytree, I planned to do it but on the day I planned to it was very overcast and I didn’t want to queue and waste my money on a cloudy day. But there are so viewing towers in Tokyo you can take your pick.

Ask me anything or tell me if there’s something else you loved while you were here?

x

How I feel: two weeks after I quit my job to travel

I don’t think there’s any right answer to that.

Excited. Happy. Guilty. Worried. Scared. Curious. Inquisitive. 

All of the above and more.

I had a rejection earlier this week for a job I interviewed for and hoped to go to when I returned. It’s fair to say it hit me hard and I’ve spent this week worrying and over-analysing it to death. Why didn’t they want me? What did I do wrong? Did I really misread how well the interview went?

I still feel like that but it’s alongside the excitement and adrenaline rush I get from all my travels. Not just a new country other a new city but every morning when I leave wherever I’m staying I get a rush of excitement and a bounce in my step that makes me so excited for the day ahead and where it might lead me. Is that weird? Am I the only one who is like that?

I don’t know.

What I do know is that I can’t be completely sad about not getting a job because I’m too happy doing what I’m doing now – exploring Japan and preparing to fly to Hong Kong at the end of this week. But at the same time I’m sad I don’t have a job I love to look forward to.

Sometimes I wish someone would tell me what the right thing is to do. But for now I’m just going to enjoy myself.

72 hours in Copenhagen

My recent trip to Copenhagen was really exciting because I’d never been to Denmark before but also it meant I could take as trip across the Øresund Bridge to Malmö in Sweden – one of my favourite countries in the world.

We took the Ryanair spring flight offer and ended up with return flights for £24 (!!!) And we booked an Airbnb for accommodation and that was £60 a night for the whole apartment. So for three nights and three of us travelling, it was only £60 each. So flights and accommodation for £84 meant we saved some serious money to make up for the Scandinavian country being slightly pricier.

Day 1

We arrived late in the afternoon and staying in Frederiksberg meant we were perfectly placed to get on the metro and go out to explore. We bought the 72hr Copenhagen card which covers all transport and over 79 attractions in Copenhagen so well worth the money!

1st stop – the Round Tower. With clear skies at 4pm we decided these 360 degree views were a great start to seeing the city and it was included in the Copenhagen card. It is and so and so steady slope upwards rather than steps so that made and so nice change for tired legs!

2nd stop – Gråbrödretorv. A gorgeous square with trademark colourful buildings and lots of al fresco cafés and restaurants for a quick refresher before we went out for dinner in Indre By – the central city where you’re spoilt for choice with lots of hipster bars answer restaurants.

Day 2

1st stop – we were up early and on the S train out to Frederiksborg Castle. It’s about an hour out of Copenhagen but the transport and entry to the castle museum and gardens are all included on the Copenhagen card. This castle and the gardens are like a fairytale on an beautiful blue lake. The town is also gorgeous and worth a visit for a quick bite after walking around all the stunning ballrooms and botanical gardens.

2nd Stop  – back to the City to get lost in the pretty streets. City hall and city square, Christiansborg Palace and Børsen (he old stock exchange) are some great sights along with a wander along the canals.

3rd stop – after dinner we went to an incredible jazz bar with live jazz and great beer with a lovely local atmosphere, Hvide Lam  (means white lamb) they have different local jazz groups every night and it’s in a cute red building in Kultorvet square – you can’t miss it!

Day 3 

1st stop – it’s actually a lot of stops at we walked very far and saw loads of sights. But first: the iconic Nyhavn on the waterfront. This is an absolute must see especially in the sun when it’s full of people and music.

2nd stop – Amalienborg Palace. Make sure you stop by here at midday to see the changing of the guard!

3rd stop – walking along the waterfront and through the fort up to the Little Mermaid statue – be warned, it’s smaller than you think!!

4th stop – SWEDEN! WE took the train from Copenhagen central station to Sweden, it’s approx £20 return and you get to go across the gorgeous Øresund Bridge. Malmö is small but beautiful. Make sure to check out the Lilla Torg – the central square in old town, it’s expensive but nice to sit out and grab a beer or two. Slottsträdgårdens is lovely to walk around and see the lake, wildlife, botanical gardens and a splendid windmill! Sankt Petri Kyrka is a Scandinavian Catholic Church with the biggest organ in Europe under construction, it’s free to go in so check it out. Enjoy the relaxed scandi atmosphere and all the waterways as well as the spectacular Øresund Bridge.

Day 4

1st stop – Copenhagen Bikes! We rented bikes for our final day to give our feet a rest. First stop was across the canal to take a scenic route around the lakes a rounded Christianshavn Free Town which was set up in the 1980s and still maintains its hippie vibe with homemade stalls, music, artistic street art and alcohol free cafés. You’ll also find the incredible Street food market on this side of the water – so much food and drink to choose from with a view of the bay – don’t miss this if you enjoy something different. 

2nd stop – Rosenborg Palace. This gorgeous castle is set in a park in the centre of the city where on a sunny day you’ll find all the locals hanging out, sunbathing, reading or playing football. Across the road is also the Rosenborg Botanical Gardens which are free and spectacular (and warm if you’re visiting in winter!!) 

3rd stop – we took a cycle around the three man-made lakes in the city. It’s so easy to cycle here – most people do so the roads are very safe, there are bike lanes and motorists are very aware of you. The lakes have great views of the city and are good for a lazy afternoon. 

4th stop – drinks as the sun goes down on Nyhavn. It’s expensive here but for one drink as a tourist, it’s a must do, especially for us to finish off our trip!

Alternative holidays: adventure in the Alps

Having taken many trips to Calais, France when I was much younger, I’ve never been particularly fussed about going back to France apart from my city trips to Paris or Nice. However, a couple of summers ago I went on a trip to the Alps resorts of Les Gets and Morzine for an active holiday and extreme sports. Boy was I glad I decided to go, and here’s why you should too.

In the summer months, the mountain resorts are very warm (great if you’re a fair weather traveller like me!) the ski slopes are transformed into mountain bike trails and the hiking trails are endless!

Even for just a walking holiday I can wholeheartedly recommend this destination. The views are spectacular of the mountains and valleys, with the stunning Mount Blanc being the main attraction. The ski lifts are still running so you can use those to reach the trails further up the mountain.

But the extreme sports were my favourite – canyoning, paragliding, white water rafting, rock climbing, mountain biking on red or black slopes. Being a closet adrenaline junkie, I had to try everything and I loved it!

1.Canyoning – starts by abseiling off a suspension bridge down into the riverbed of the valley below. In a protective wetsuit, you follow the river through the rocky riverbed, over waterfalls, jumping off ledges and waterfalls, down rocky rapids which have been smoothed into fast-flowing slides by the water, jumping into plunge pools and caves until you reach the final huge waterfall and abseil down the final waterfall 100ft into the pool below. Definitely best to do in France because there seems to be very little health and safety, it’s not for the fainthearted though: convincing yourself to jump off and out over a 3 metre ledge to reach the pool below is a real mind-over-matter game!

2.Paragliding – again not for the fainthearted, it takes a lot of mind-over matter to make yourself run off the edge of a mountain attached to a partially inflated parachute. But I imagine it’s a nice in between before jumping out of a plane! Best done in the afternoon when the thermals are best so the hot air takes you higher and gives you more air time. But the views of Mount Blanc opposite and the valley below are simply breathtaking.

3. White water rafting – a classic adventure sport that never gets old. Again there is less health and safety and the currents are extremely strong so if you’re not a strong swimmer it’s bet to pick a calmer river route or at least try to stay in the boat!

4. Mountain biking – this is the easiest sports to do while you’re in the resort as it can be adapted for any level of sport enthusiast. A lot of the trails follow the winter ski slopes and trails, so follow a green or blue route for an easier cycle. Red slopes are more of a challenge, be wary of the steep edges and sharp corners – we saw a few broken arms in the week I was there! I wouldn’t recommend black slopes or the specially cut mountain bike slaloms unless you know what you’re doing.

All in all, I really underestimated what else there was to offer for alternative trips in France. I’m sure Les Gets and Morzine are beautiful in the winter season, but in summer there was so much to offer than I could keep you busy and active out in the fresh air and sun for a week or two – great if you’re like me and get bored sitting by the pool and sun-worshipping for a week!

Have you been on any alterative or adventure trips? Let me know!

My story: how I was born and raised as a backpacking traveller

Are there those of you out there with a family who wonder how to start a travelling lifestyle together and how best to do it with young children?

Well I can tell you my point of view – as a child who was raised travelling out a backpack.

I’m 23 years old and from the age of 8 my parents took me and my little brother travelling during our school holidays. While all my school friends went on holiday to Spain or France, we went on trips across continents living out of our backpacks for weeks or months.

The best thing my parents did was to start doing this young – I never questioned why we didn’t stay in 5-star or all-inclusive resorts like my friends’ families. Soon I realised the way we travelled was not normal and it was a novelty other people loved to hear about.

Age 10 – backpacked around Australia’s North Territory and the East Coast for two months.
Age 11 – backpacked West coast of America.
Age 12 – backpacked East coast of America and Canada.
Age 13 – hiked Scotland and up to the Isle of Skye.
Age 14 – road trip in New England
etc etc, by age 16 I was travelling confidently alone

So how did we do it?

  1. Never took more than a 60litre rucksack: my parents taught me how to roll and pack effectively from the age of 8.
  2. Learnt to plan our daily movements around reaching the next campsite.
  3. Buying a cheap tent when we arrived in a country – it saves baggage costs of taking one and is suited for the country better.
  4. Designated one night a week to stay in a motel/cheap hostel – this is the ‘treat’ of having your own bathroom and a proper mattress – doesn’t mean it’s cleaner than a campsite!
  5. Always took the cheapest budget/economy means of transport.
  6. Always took trips that were at least a month long, living out the rucksacks. This showed us how much more we could get from our trip if we travelled right.
  7. Always rented our own car so we could travel at our own pace to our own budget.
  8. Taught us the value of experiences rather than material possessions.
  9. Planned out budget around experiences, not luxuries.

This last one is by far the most important. Our parents would give us a choice – do you want a snorkelling boat trip out on the Barrier Reef and we stay in a campsite for an extra week, or do you want a 5-star hotel? Clue: we never picked the 5-star. Our parents taught us the value of the experiences you can have and the enrichment of life that you gain from that – at any age.

It’s not about being thrifty, it’s about choosing how and what you spend your money on: what you value.
Don’t get me wrong, for some people all-inclusive and 5-star resorts are exactly the break they need during their hard-earned holiday time. But because of my experiences I’ve never been a sun-worshipper or an all-inclusive kind of girl. I need to be busy and exploring and active to gain value from my travels.

I have my parents to thank for instilling a sense of adventure in me and the need to experience the countries I visit fully. I was never shown any different, but I very soon came to appreciate how much more I gained from out way of travelling – even if it meant using an RV hose for a shower on a campsite for a week, or finding cockroaches in my sleeping bag!

Top tips for Iceland

So I’ve already posted my itinerary of how I packed all my activities into my trip to Iceland and while it was only a short trip, it still wasn’t a cheap break like the many city breaks you see advertised.

I’m a firm believer that if you travel and there are things that you really want to do then money shouldn’t stop you, it is completely possible to budget for those more expensive aspects because the way I see it, the experience is worth it if it’s something you really want to do.  So whilst I am willing to spend money to do and see the things I want, there are still some handy tips I found especially useful to save money and make the most out of the money I did spend.

  1. Shop at the store
  2. This was an absolute lifesaver. Food and drink is super expensive to buy from restaurants and cafés in Iceland, but supermarket bought food is significantly cheaper. On the first day I went to the supermarket nearest our hotel and bought bread, cheese and tomatoes to make sandwiches, some fresh fruit, crisps, nuts and some chocolate. These lasted us the 3 days we were there as handy packed lunches that we took with us every day instead of buying meals at the expensive rest stop cafés.

  3. Look for deals
  4. This is also linked to the food and drink. We had a deal where one evening’s meal was included in the cost of our hotel stay and that was really handy. For our other evening meals we looked for Happy Hours and these are everywhere in the city. Generally between 5pm-7pm but sometimes longer, food and drink is all around half price. You’re looking at £25 for two to eat, rather than £50. Also beers half in price from around 900kr (£5) to 400kr (£2.50).

  5. Use public transport
  6. I try to do this in every country I go to just because I feel like you get more of a sense of the city and the people and see more of communities on local transport rather than sitting on an air-conditioned tourist coach. We paid 500kr (£2.80) for a return ticket which took us the 40 minute journey into the city and back. Also, their buses are super punctual, even in heavy snowfall, 10/10.

  7. Stay outside the city
  8. This was probably our biggest money saver of the trip. We stayed in a lovely, well-catered for, well-located hotel with lovely staff, with all the tourism and transfer links to the city, airport and tours. It probably cost us less than half the price of staying in central Reykjavik. We were 20 minutes out of Reykjavik on the direct motorway route, or a 40 minute public bus journey. It also meant we were nicely situated half way between the airport and Reykjavik as Keflavik airport is 40 minutes from the city. So we were first drop off and last pick up for airport transfers. Same for Blue Lagoon trips which is out towards the airport too.

  9. Look for multi-trip deals with excursion companies
  10. Lifesaver. It was so much quicker and easier to book through one company too. Often if you book one or two tours with them you can get other offers. We used Reykjavik Excursions. They also have a policy where if you don’t see the Northern Lights on your excursion then you can go again for free the following night, or every night for the rest of your trip, until you see them.

  11. Hopper bus
  12. We used the city sightseeing bus which I really think is underestimated for travellers just because it seems touristy. But, for the equivalent of £25 it takes you to see all the main sights of the city, you can get off and spend as long as you like at each one, and the ticket is valid for 24 hours, so if you buy the ticket at 12 noon, you can use it just as a transport facility to get around the city until midday the following day too.

image